Sådan indsættes datovælger i Excel?
For at indsætte Drop Down Calendar bruger vi en ActiveX-kontrol, som er 'Microsoft Date and Time Picker Control 6.0 (SP6)' .
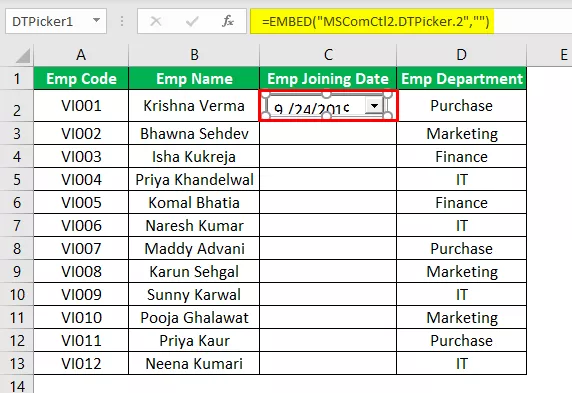
Antag, at vi skal vedligeholde data for medarbejdere i en virksomhed. Der er flere felter som
- Emp-kode
- Emp-navn
- Emp-tiltrædelsesdato
- Emp-afdelingen
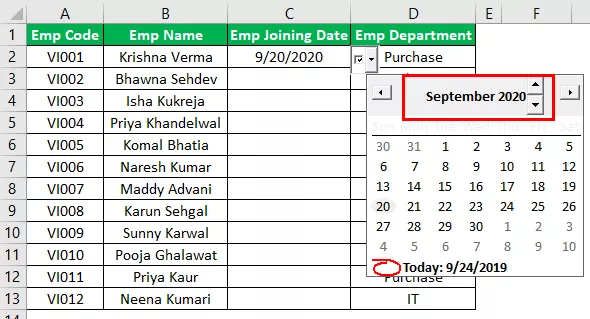
For at indtaste data i MS Excel har vi oprettet følgende format.

For at indtaste Emp-tilmeldingsdato skal vi oprette en rullemenu, så det bliver lettere for brugeren at indtaste tilmeldingsdatoer.
For at oprette en rullemenu er nedenstående trin angivet -
Vi skal indsætte en 'ActiveX-kontrol' med navnet 'Microsoft Date and Time Picker Control 6.0 (SP6)' . For at indsætte bruger vi kommandoen 'Indsæt' under gruppen 'Kontrol' i 'Udvikleren'.
Hvis fanen 'Udvikler' ikke er synlig, er nedenstående trin til at gøre det samme synligt.
- Trin 1: Under 'Filer' menuen, vælg 'Indstillinger'

- Trin 2: En dialogboks med navnet 'Excel-indstillinger' åbnes. Vælg 'Tilpas bånd' fra venstre kant af dialogboksen. Afkrydsningsfelt for fanen 'Udvikler' og klik på 'OK'.

- Trin 3: Nu kan vi se fanen 'Udvikler' sidst på båndet.

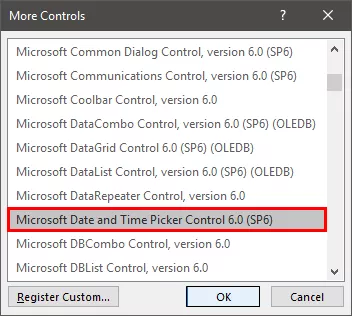
- Trin 4: Vælg 'Flere kontroller' fra ActiveX-kontrolelementer.

- Trin 5: Vælg 'Microsoft Date and Time Picker Control 6.0 (SP6)' fra listen og klik på 'OK'.
- Trin 6: Klik et vilkårligt sted på regnearket for at oprette rullemenuen.
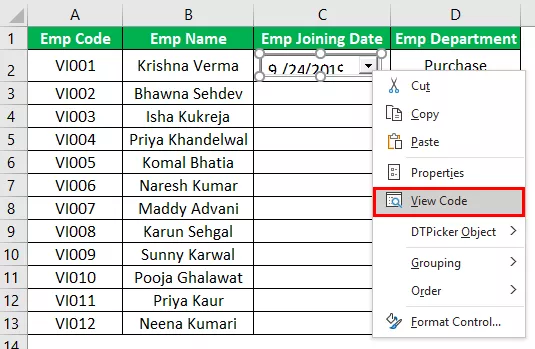
- Trin 7: Højreklik på 'Datovælger' og vælg 'Egenskaber' fra listen.

- Trin 8: Skift værdien fra 'False' til 'True' for egenskaben 'CheckBox', så nulværdier også kan accepteres. Luk dialogboksen 'Egenskaber' .

- Trin 9: Højreklik på Datovælger igen, og vælg 'Vis kode' i kontekstmenuen.
- Trin 10: I 'Visual Basic Editor' kan vi se, at noget kode allerede er skrevet. Udskift koden med følgende kode.
Kode:
Privat underarbejdsark_SelectionChange (ByVal-mål som rækkevidde) med ark1.DTPicker1 .Højde = 20 .Bredde = 20 Hvis ikke skæres (mål, rækkevidde ("C: C")) er intet så. Synlig = sand .Top = mål.Top. Venstre = Target.Offset (0, 1). Venstre .LinkedCell = Target.Address Else .Visible = Falsk afslutning hvis slutning med slut-sub

- Trin 11: Den første sætning i koden fortæller MS Excel Compiler at køre koden, når der vælges en ny celle (valg ændres). Den valgte celle sendes til underproceduren som 'mål'.
Private Sub Worksheet_SelectionChange(ByVal Target As Range)
- Step 12: These statements set the height and width of the Date Picker to 20 points in excel. It can be observed that we have used the ‘With’ operator so that we do not need to refer to DTPicker1 again and again.
With Sheet1.DTPicker1 .Height = 20 .Width = 20
- Step 13: The following ‘If’ clause sets the criteria that if any cell is selected in the ‘C’ column, only then Date Picker gets visibility. We have used the ‘Intersect’ function as this function checks whether we have selected any cell in the C column, then this function will return the address; otherwise, the value would be null.
If Not Intersect(Target, Range("C:C")) Is Nothing Then .Visible = True
- Step 14: ‘Top’ property of Date Picker is set as equal to the ‘Top’ property value of the Selected cell. It means that this will go along with the upper border of the selected cell.
.Top = Target.Top
- Step 15: This statement sets the left property of the Date Picker as equal to that of the next right cell of the selected cell (Distance of left border of the D column from the extreme left of the worksheet). To get the reference of the next right cell, we have used the ‘Offset’ function with 0 as row argument and 1 as column argument as this will get a reference to the cell in the next column.
.Left = Target.Offset(0, 1).Left
- Step 16: This statement links the Date Picker with the Target cell so that whichever value is selected in the drop-down calendar that is displayed in the cell.
.LinkedCell = Target.Address
- Step 17: The ‘Else’ statement tells the compiler to not display the Date Picker when any cell except that in the C column is selected.
Else .Visible = False
- Step 18: In the end, we close the ‘If.’
End If
- Step 19: At last, we need to close ‘With.’
End With
- Step 20: Now, Sub Procedure will end.
End Sub
Make sure we save the file with the ‘.xlsm’ extension as it saves the VBA code we have written, and we will be able to run this code when any cell is selected in the C column.
Now, whenever we select any cell in the ‘C’ column, we can see a drop-down calendar at the top right corner of the selected cell. We can open the drop-down calendar by clicking on the down arrow symbol.

We need to click on any date in the calendar in the selected month to enter that date in the selected cell.

We can change month to previous or next using the arrow button placed at the left and right side of the calendar.

We can also click on the month to choose a month from the drop-down.
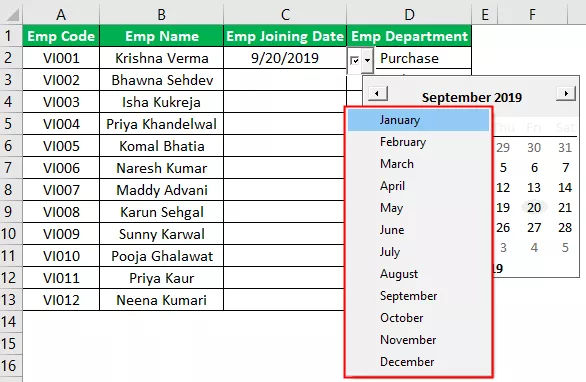
We can also change year by clicking on year and then using up and down arrows to choose the required one.
Things to Remember
- ‘Microsoft Date and Time Picker Control 6.0 (SP6)’ is not available for the 64-bit version of MS Excel.
- Efter at have skrevet VBA-koden skal vi gemme filen med '.xlsm' (Excel Macro-Enabled Workbook) udvidelse; Ellers kørte VBA-koden ikke.